Introduction to Tiramisu Balls
Tiramisu has long been a beloved classic dessert, known for its rich layers of coffee-soaked ladyfingers and creamy mascarpone. But what if you could capture that same delightful flavor in a bite-sized treat? Enter Tiramisu Balls—the perfect no-bake dessert that merges convenience with decadence.
Why Tiramisu Balls are the Perfect No-Bake Treat?
No time for an elaborate dessert? No problem! Tiramisu Balls are not only easy to make, but they also require minimal effort and no baking—ideal for the busy lifestyles of young professionals. Imagine coming home after a long day and treating yourself to these sweet, delightful morsels that transport you straight to an Italian café without even leaving your kitchen.
Making Tiramisu Balls usually involves just a handful of ingredients:
- Mascarpone cheese: The creamy base that gives depth to every bite.
- Coffee or espresso: For that rich flavor that ties everything together.
- Cocoa powder or chocolate: For a decadent finish.
- Crushed ladyfingers or sponge cake: The key component that adds texture.
Not only are they quick to whip up, but Tiramisu Balls can also be easily adapted to fit various dietary preferences or constraints. Want to make them vegan? Substituting the mascarpone with a plant-based alternative can work wonders. You can even swap out ingredients to make them gluten-free. Check out resources like The Kitchn for more fun adaptations.
Moreover, these treats store beautifully in the fridge, meaning they’re perfect for meal prep or last-minute gatherings. Picture it: you’ve got friends dropping by and you want to impress them without the stress. Tiramisu Balls are the answer to your culinary prayers.
So, whether you’re looking to indulge yourself after a long week or brighten up a gathering with delightful, homemade sweets, Tiramisu Balls offer a fantastic solution. Trust me, once you try them, you’ll be hooked!
If you’re ready to dive into making these scrumptious treats, let’s take a closer look at the full recipe in the next section!

Ingredients for Tiramisu Balls
What you’ll need for the base
Making Tiramisu Balls starts with a few essential ingredients that create that rich, coffee-flavored foundation. Here’s what you’ll need:
- Ladyfinger Cookies: This is the classic base that gives the dessert its structure.
- Mascarpone Cheese: The creamy texture of mascarpone will take your Tiramisu Balls to another level.
- Strong Coffee: Brewed espresso works best, as it infuses that authentic coffee flavor.
- Sugar: Just a bit to balance the bitterness of the coffee.
You can find all of these ingredients at your local grocery store, or you can explore specialty shops that focus on Italian cuisine for the freshest options.
Extras for coating and sweetness
To elevate your Tiramisu Balls, you’ll want some delicious extras:
- Cocoa Powder: A must for that classic Tiramisu look and taste.
- Chocolate Shavings or Chips: For a sweet crunch and extra decadence.
- Chopped Nuts: Almonds or hazelnuts can add an interesting texture—who doesn’t love a bit of crunch?
Exploring different coatings can bring unique flavors to your Tiramisu Balls, so feel free to get creative! Remember, a little prep work goes a long way in creating this delightful treat. If you’re looking for more tips, you might check out Italian Cooking Techniques for ways to perfect your approach!
Preparing Tiramisu Balls
Tiramisu Balls are the perfect treat for any occasion, combining the classic flavors of tiramisu in a delightful, bite-sized form. Whether you’re looking to impress at your next gathering or simply want a sweet treat after a long day, these indulgent desserts are always a hit. Let’s dive into the steps you need to follow to make your own delicious Tiramisu Balls!
Pulse the lady fingers
The foundation of your Tiramisu Balls starts with lady fingers, or savoiardi, which is essential for that authentic tiramisu flavor. If you don’t have these on hand, you can easily find them at most grocery stores or even online.
- Start by placing approximately 24 lady fingers into a food processor.
- Pulse them until you have fine crumbs. It’s okay if a few larger pieces remain, as they add texture.
- Tip: If you don’t have a food processor, you can use a zip-top bag and a rolling pin to crush the lady fingers manually.
Once you have your lady fingers ready, you’re just a few steps away from transforming those crumbs into delectable Tiramisu Balls!
Mix the base ingredients
Next up, you’ll want to blend those crumbs into a rich and creamy mixture. Here’s what you’ll need:
- 8 oz of mascarpone cheese, softened
- 1 cup of heavy cream
- 1 cup of brewed espresso, cooled (you can use strong coffee if espresso isn’t available)
- 1/3 cup of sugar
- A teaspoon of vanilla extract
- In a large mixing bowl, combine the mascarpone cheese, heavy cream, sugar, and vanilla extract.
- Fold in the lady finger crumbs and brewed espresso until everything is evenly combined.
- The mixture should be creamy and thick but still manageable for rolling.
This step is all about bringing those beautiful flavors together. If you want to learn more about the origins of tiramisu, check out this article on Serious Eats to understand why this dessert has captivated so many!
Portion and roll the mixture
Now that you have your luscious mixture, it’s time to create those enticing Tiramisu Balls.
- Use a small cookie scoop or a tablespoon to portion out the mixture.
- Roll each portion into a smooth ball with your hands.
- Place the rolled balls on a lined baking sheet or a plate.
Pro tip: Dampen your hands slightly to prevent the mixture from sticking. You can make these balls as large or small as you wish, but bite-sized is the way to go for easy enjoyment!
Chill for that perfect texture
To achieve the perfect texture for your Tiramisu Balls, chilling is crucial. It allows them to set and hold their shape better.
- Cover the baking sheet or plate with plastic wrap and place the Tiramisu Balls in the refrigerator for at least 2 hours.
- If you can, let them chill overnight — this really helps the flavors meld beautifully.
Chilling also helps to enhance the overall taste, making your Tiramisu Balls even more delightful.
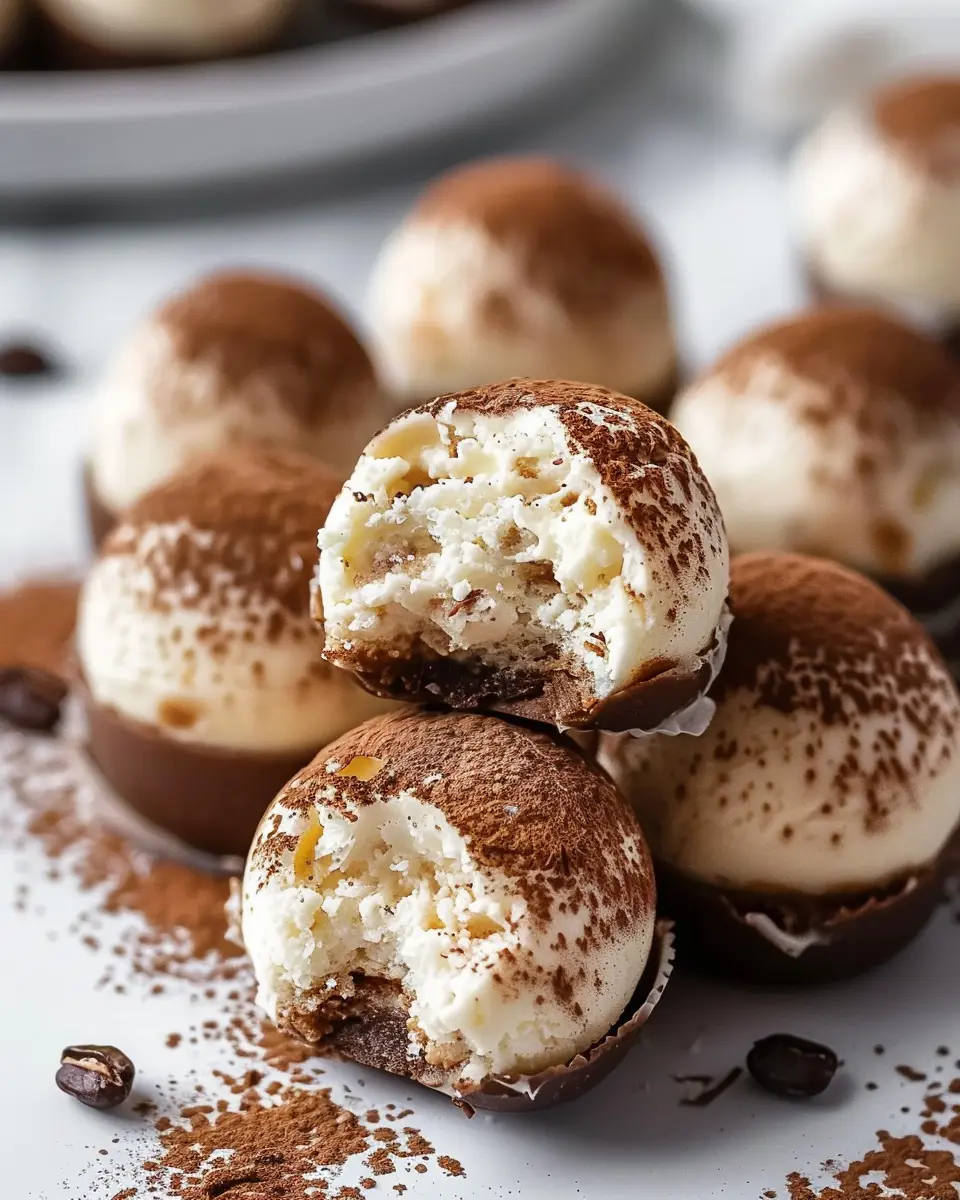
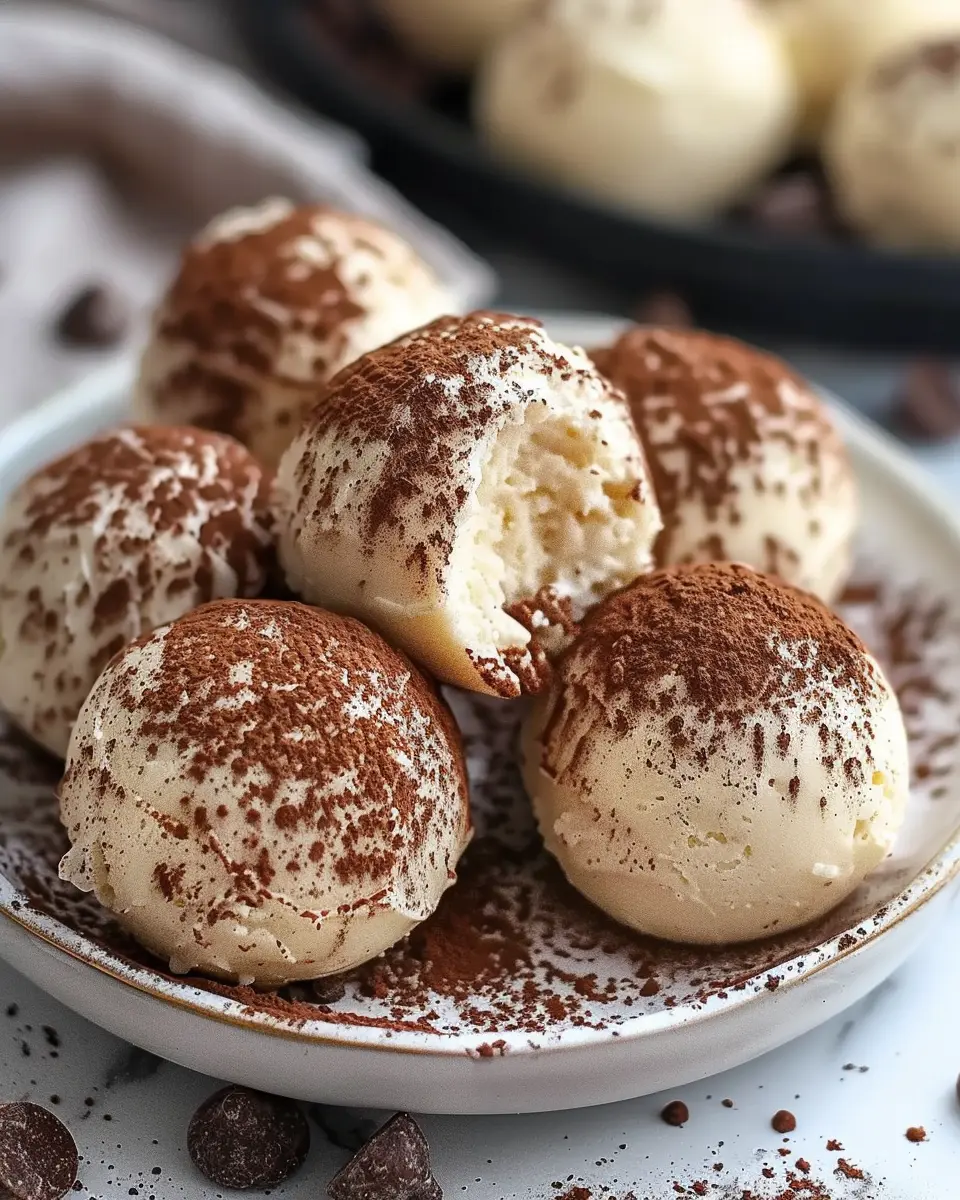
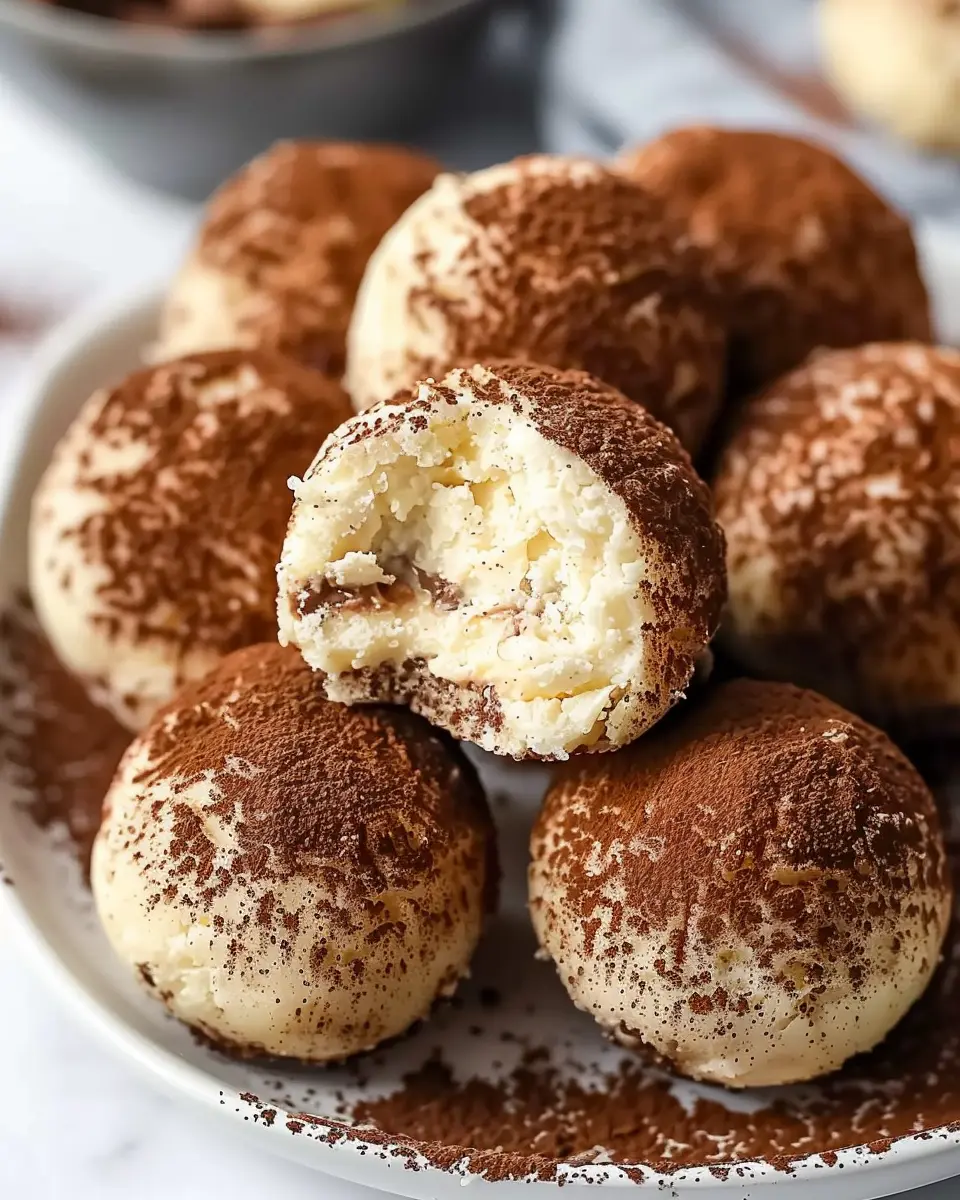
Coat your Tiramisu Balls
Finally, the last step: the finishing touch that elevates your Tiramisu Balls. You can choose from various coatings, such as:
- Unsweetened cocoa powder
- Grated dark chocolate
- Shredded coconut (for a fun twist)
- Once chilled, roll the Tiramisu Balls in your chosen coating until they are fully covered. If you like, you can use a fine meshed sieve to dust cocoa powder evenly.
Remember to serve these decadent treats chilled and maybe with an extra sprinkle of cocoa powder or a drizzle of melted chocolate for visual appeal.
Now that you’re equipped with all the steps to create irresistible Tiramisu Balls, it’s time to roll up your sleeves and get started. You’ll be amazed at how these little bites can bring so much joy to your life and gatherings!
Variations on Tiramisu Balls
Chocolate-covered Tiramisu Balls
If you’re a fan of chocolate (and who isn’t?), you’ll love this variation of Tiramisu Balls. Imagine luscious espresso-infused bites coated in a rich chocolate shell. For this version, start by preparing your basic Tiramisu Balls, then dip each one into melted dark chocolate. Let them chill in the fridge for an hour until the chocolate hardens. The result? A delightful contrast of flavors and textures: the smooth chocolate enveloping the creamy, coffee-flavored center.
Consider using high-quality chocolate for coating, as it enhances the overall taste. You can even sprinkle on a touch of sea salt or cocoa powder for an extra touch of luxury. If you’re looking to indulge further, try adding chopped nuts or sprinkles on top while the chocolate is still wet—the perfect way to impress at your next gathering!
Tiramisu Balls with a Fruity Twist
Who says Tiramisu Balls have to be all about coffee and chocolate? For a refreshing twist, consider incorporating fruit into your creation. One delicious idea is to add mashed strawberries or pureed mango into the mixture. The fruity notes will offer a lively contrast to the espresso, creating an exciting flavor profile.
You could also roll your Tiramisu Balls in coconut flakes or crushed freeze-dried fruit for added texture and a pop of color. Using seasonal fruit not only enhances the taste but provides a delightful, vibrant aesthetic. Plus, this variation can make your dessert feel lighter and perfect for summer parties.
For more fun flavor ideas, explore BBC Good Food’s fruity dessert options! You might just discover your next favorite dessert twist.
Cooking Tips and Notes for Tiramisu Balls
Tips for Achieving the Best Texture
To create Tiramisu Balls that achieve that perfect creamy and indulgent texture, it’s crucial to select high-quality mascarpone cheese. The richer it is, the better your balls will taste. Additionally, ensure your mixture is not overly wet; a balance is key. If your mixture feels too sticky, simply add a touch more crushed ladyfingers until reaching the desired consistency.
Common Mistakes to Avoid
- Skipping the Espresso: Don’t underestimate the flavor that a good espresso brings; omit it, and you’ll miss out on that authentic taste.
- Not Chilling Long Enough: Allowing your Tiramisu Balls to chill fully is vital. This lets all those flavors meld perfectly. Aim for at least a couple of hours in the fridge.
- Over-Compacting: When rolling your balls, avoid over-compressing them. They should be firm enough to hold together but not dense.
For more inspiration, check out this expert guide. Happy cooking!
Serving suggestions for Tiramisu Balls
Pairing Tiramisu Balls with coffee or tea
When it comes to enjoying Tiramisu Balls, coffee is a classic pairing that enhances the creamy flavors while blending beautifully with the cocoa dust. A rich espresso elevates the experience, but feel free to explore other options like a smooth cappuccino or a fragrant herbal tea. If you’re uncertain which tea to choose, consider a warm chai or a light chamomile—both provide a wonderful balance to the sweetness of the dessert.
Creative ways to serve them at gatherings
Elevate your hosting game by serving Tiramisu Balls on an elegant platter. Here are some fun ideas to impress your guests:
- Mini Dessert Skewers: Thread individual Tiramisu Balls onto cocktail picks for a playful twist.
- Dessert Cups: Layer them in small glass cups with whipped cream for an eye-catching display.
- Tasting Station: Create a mini dessert bar with a variety of toppings like grated chocolate, nuts, or fruit for guests to customize their experience.
These presentations not only look stunning but also turn simple Tiramisu Balls into a delightful centerpiece for any gathering. For more ideas on presentations, check out sites like Bon Appétit.
Time breakdown for Tiramisu Balls
Preparation time
Creating these delightful Tiramisu Balls requires just about 30 minutes. You’ll be mixing and rolling delicious layers of flavor, and trust me, it’ll fly by as you enjoy the process!
Chilling time
After preparation, your Tiramisu Balls will need at least 2 hours in the fridge to fully set. This is crucial, as it allows the flavors to meld together beautifully.
Total time
In total, you’re looking at approximately 2 hours and 30 minutes from start to finish. Ideal for a weekend treat or an impressive last-minute dessert for guests! Feel free to check out this guide on chilling times for desserts for even more tips.
With just a little planning, you’ll be enjoying these indulgent bites in no time!
Nutritional facts for Tiramisu Balls
Calories per ball
When indulging in a decadent dessert like Tiramisu Balls, it’s natural to be curious about the calorie count. Each delightful ball contains approximately 120 calories, which makes them a slightly guilt-free treat. However, keep in mind how many you plan to enjoy! Moderation is key to enjoying this sweet treat without compromising your nutrition goals.
Macronutrient breakdown
For those focusing on their macronutrient intake, Tiramisu Balls offer a balanced mix. Here’s a rough breakdown per ball:
- Carbohydrates: 15g
- Protein: 3g
- Fat: 6g
The combination of flavors and textures in these bites not only satisfies your sweet tooth but can also be enjoyed as an occasional indulgence within a balanced diet. If you’re interested in more details on dessert nutrition, check out Healthline’s guide on dessert calories.
What’s your favorite way to enjoy these? Have you tried adding nuts or a twist of zest for an extra flavor kick?
FAQs about Tiramisu Balls
Can I make Tiramisu Balls ahead of time?
Absolutely! Making Tiramisu Balls ahead of time is a great way to save on preparation time, especially if you’re entertaining guests. You can prepare these delightful treats a day or two in advance. Just remember to let them set in the fridge after you roll them into balls so they achieve that perfect firmness and flavor infusion. Feel free to store them in an airtight container to keep them fresh and prevent any drying out.
How can I make them gluten-free?
Want to indulge in Tiramisu Balls while avoiding gluten? No problem! You can simply substitute traditional ladyfingers with gluten-free biscuits. Options like gluten-free vanilla wafers or almond flour-based cookies work wonderfully. Additionally, always double-check that your cocoa powder and any other additives are certified gluten-free to ensure a safe and delicious treat.
What’s the best way to store Tiramisu Balls?
The best way to store your Tiramisu Balls is in a tightly sealed container in the refrigerator. They’ll typically stay fresh for about 3 to 5 days, but trust me, they’re usually gone much sooner than that! For longer storage, you can freeze them; just be sure to separate layers with parchment paper to prevent sticking. When you’re ready to enjoy them again, simply thaw them in the refrigerator, and they’ll taste just as delightful as when you made them.
If you’re looking for a scrumptious recipe to tackle on a quiet weekend, check out additional tips and tricks on How to Make the Perfect Tiramisu for more inspiration. Happy cooking!
Conclusion on Tiramisu Balls
A delicious end to your homemade treat journey!
As you savor your last Tiramisu Balls, it’s hard not to feel a sense of accomplishment. These delightful bites are not just a testament to your culinary skills but also a sweet reminder that homemade treats can elevate any occasion. The blending of rich coffee flavor with creamy mascarpone creates a symphony of taste in every bite.
Whether you’re sharing them at a gathering or enjoying them solo after a hectic day, Tiramisu Balls have a way of bringing joy. Remember, the best part about making these is personalizing them! Try variations like adding nutty cocoa or different textures for fun. Happy indulging!
For more dessert inspiration, check out Sally’s Baking Addiction and Serious Eats for delicious ideas!
PrintTiramisu Balls: Indulgent Treats for Home Chefs to Enjoy

Make these delightful Tiramisu Balls that will satisfy your sweet tooth. A perfect treat for coffee lovers!
- Prep Time: 30 minutes
- Cook Time: 0 minutes
- Total Time: 2 hours 30 minutes
- Yield: 24 balls 1x
- Category: Dessert
- Method: No-Bake
- Cuisine: Italian
- Diet: Vegetarian
Ingredients
- 1 cup mascarpone cheese
- 1/2 cup heavy cream
- 1/2 cup espresso, cooled
- 1/4 cup sugar
- 1 teaspoon vanilla extract
- 1 cup crushed ladyfingers
- 1/4 cup cocoa powder for dusting
Instructions
- In a mixing bowl, combine mascarpone cheese, heavy cream, espresso, sugar, and vanilla extract. Mix until well combined.
- Fold in crushed ladyfingers until fully incorporated.
- Form the mixture into small balls and place them on a baking sheet.
- Chill in the refrigerator for at least 2 hours.
- Before serving, dust with cocoa powder.
Notes
- Try using different flavored extracts for a twist.
- Keep the Tiramisu Balls refrigerated until serving.
Nutrition
- Serving Size: 2 balls
- Calories: 150
- Sugar: 5g
- Sodium: 50mg
- Fat: 10g
- Saturated Fat: 6g
- Unsaturated Fat: 2g
- Trans Fat: 0g
- Carbohydrates: 15g
- Fiber: 0g
- Protein: 3g
- Cholesterol: 30mg
Keywords: Tiramisu Balls, dessert, coffee treats